Automatic shutdown increases the screen brightness of Windows 10
Turning off the auto-light feature on Windows 10 will help you adjust the brightness according to your preference, without having an annoying flashing light when changing from light to dark and vice versa.
The Brightness Adaptive feature allows Windows to automatically adjust the screen brightness according to the ambient light thanks to the built-in light sensor on the screen, especially the laptop.
What is Adaptive Brightness?
Adaptive Brightness is a built-in feature of Windows, which allows the operating system to automatically adjust the brightness of the screen according to the ambient light, thanks to the built-in light sensor on the screen, especially are new laptops.
But not all users find this feature useful, especially when switching from light web sites to dark backgrounds and vice versa. On the other hand, this feature only works well on machines that are fully installed with drivers. Therefore, many people seek to turn off this feature. If you do so, you can find a solution in the next section of this article.

Turn off the light correction feature on Win 10 via MS Service
Click Windows + R to open the Run window, type services.msc, and press Enter .
In the services window that opens, find and double-click the Sensor Monitoring Service . Click Stop , then in Startup type , click the down arrow, select Disabled and click OK to save.
Restart the computer to see if the auto-lighting mode has been turned off.
Turn off Windows 10 auto-lighting via Control Panel
To enable or disable the Adaptive Brightness feature on Windows 10, follow the steps below:
First click on the Start button, then enter the Power Options keyword into the Search box to open the Power Options window.
In the Power Options window, click the Change Plan Settings button next to the Power Plan you are using or the Power Plan you want to edit.

At the bottom of the window you will see the Change advanced power settings option , your task is to click to select that option.
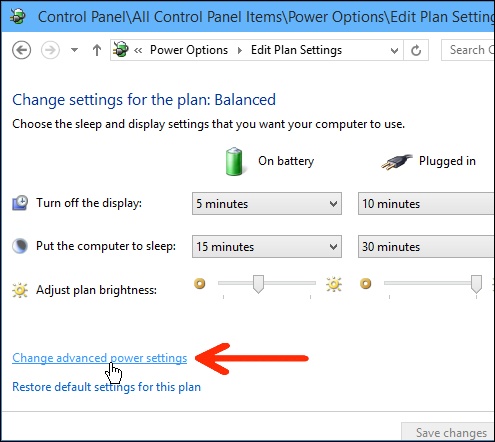
A small dialog box appears on the screen.

In this dialog box, scroll down to find the option named Display option , then click the small plus (+) icon next to the option.
After clicking on the plus symbol (+), on the screen you will see options. Your task is to find and select the option Enable adaptive brightness . Here you set the changes you want, then click OK to save the changes.
Also, on Windows 8.1 or Windows 10 versions released before Windows 10 Fall Creator Update, you can turn off the lightening automatically using System Settings. From Windows 10 Fall Creator Update version, this feature has been removed.
To change the screen brightness through system settings, go to Settings => System => Display .
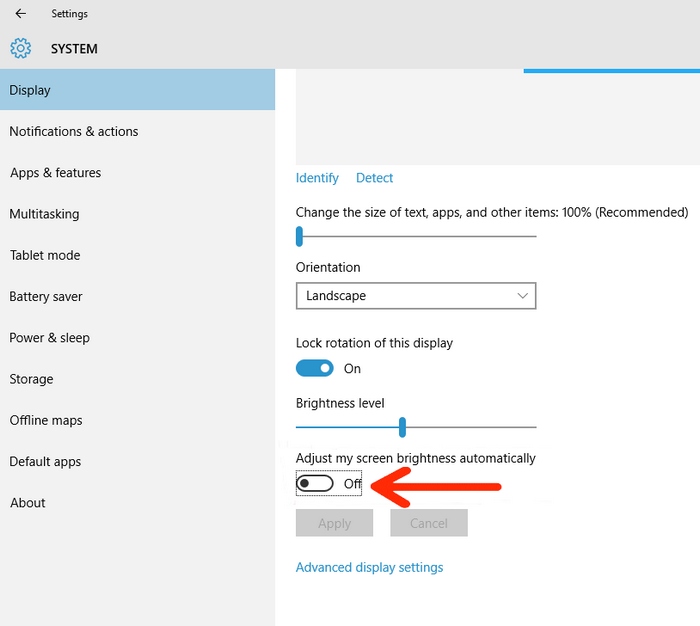
Next, scroll down to find the Adjust my screen brightness option automatically and switch to ON or OFF to enable or disable the option.
Turn off Intel's battery saving technology
If your computer still automatically changes the screen brightness after you have done so, see if you are using Intel graphics? Intel integrates battery-saving technology to increase the time it takes to carry laptops out. This feature may be the reason for turning off auto-brightness correction and that the screen stays dark automatically according to the website color.
To turn this feature off on Intel graphics machines, do the following:
- Right-click on the desktop> select Graphics Properties . If this option is not available, go to Control Panel > change View by (in the upper right corner, under the search box) to Small icons > click Intel HD Graphics .
- In the Intel HD Graphics Control Panel window that appears, select Power .
- On the left pane select On Bettery .
- Finally, in the Display Power Saving Technology > Display > Apply option and close the window.
Turn off AMD battery saving technology
If using AMD graphics, follow these steps to turn off the Windows 10 screen auto-light feature:
Open Catalyst Control Center by typing CCC in the search box> select CCC - Advanced> Graphics> Power Play> turn on Vari-Bright.
Refer to some of the following articles:
- Fix Windows 10 error with just one click with FixWin
- Clear the Windows 10 Update Cache to free up memory space
- Instructions for upgrading from Windows 10 32-bit to 64-bit
Good luck!
- Fix the error of not adjusting screen brightness on Windows 10
- Instructions to adjust the screen brightness of Android phones
- How to adjust the screen brightness of Windows 10 on the desktop
- Tutorial 4 ways to adjust the screen brightness of Windows 10
- How to turn off the feature automatically adjusts screen brightness on iPhone
- Top 5 best screen brightness control apps on Android