Summary of some simple ways to disable USB ports on Windows computers
You can imagine that USB ports are like door scenes, and other users or malware, viruses can spread and access your system anytime through this path. So to protect important data on your Windows computer, you can disable the USB port.
You can imagine that USB ports are like door scenes, and other users or malware, viruses can spread and access your system anytime through this path. So to protect important data on your Windows computer, you can disable the USB port.
In the following article, Network Administrator will guide you through some simple ways to disable USB ports in Windows operating system.
1. Disable USB port by disabling Autorun
Most malware spread through USB devices is because Autorun automatically executes a file mentioned in the autorun.inf file located on the root of the USB device directory tree.
Therefore the best way is to disable Autorun to disable the USB port, prevent malware, viruses from attacking your computer.
To do this, follow the steps below:
1. First press Windows + R key combination to open the Run command window, then enter Gpedit.msc into it.
2. On the new window that appears on the screen, navigate to the key:
Computer Configuration => Administrative Templates => Windows Components
Next, click Autoplay Policies .
If you use Windows XP, navigate to the key:
Computer Configuration => Administrative Templates => System
4. In the Details panel, double click on Turn off Autoplay .
5. Click Enabled, then on the Turn off Autoplays dialog box, click All drivers to disable Autorun on all drives.

2. Use the BIOS
This is the simplest and easiest way to do it. When you start your computer, click Delete, F2, F8 . to access the BIOS. Here, go to Advanced Settings or Onboard Devices (depending on the different mainboard types, the access shortcut and the menu order are different):

In the USB Configuration section, change the mode to Enable to Disable, then press F10 to save the changes and restart the system.
3. Disable USB port through Registry
To disable USB ports on Windows computers through the Registry, follow the steps below:
1. Press the Windows + R key combination to open the Run command window. Alternatively, click Start, then click Run .
2. Next on the Run window, go there to open the Registry Editor.

3. In the Registry Editor window, navigate to the key:
HKEY_LOCAL_MACHINESYSTEMCurrentControlSetServicesusbstor

4. Next in the right pane, double-click Start .
5. In the Value Data box, set the value to 4 and click OK .

6. Finally close the Registry Editor window and refresh your computer.
7. If you want to re-enable the USB port, take the same steps and set the value in the Value Data frame to 3.
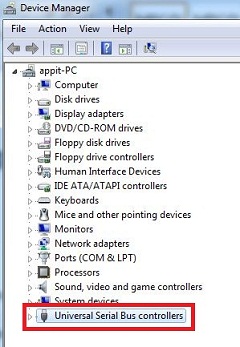
4. Disable USB port through Device Manager
This is one of the simplest ways to disable USB ports on Windows 7 and Windows 8.
1. Enter device manager in the Search box on Start Menu, then press Enter to open the Device manager window.
2. On the Device Manager window, find and click Universal Serial Bus Controllers (USB) .
3. Double-click the specific USB port.
4. On the USB Root dialog window, click the Driver tab .
5. Click Disable .

5. Disable USB port by using software
You can download or buy software, the best tool to protect your Windows 7 computer from loss or theft of data when enabling or disabling USB ports. Alternatively, you can download USB Drive Disable Pro to enable or disable the USB port on your Windows 7 laptop / computer.
Download USB Drive Disable Pro to your device and install it here.
6. Disable USB port on Windows 7 using USB Mass Storage
Every time you plug in a USB drive on a Windows computer, Windows will check the driver installation or not. If Windows cannot find the USB driver, then you will have to install the USB driver. After you have installed the USB driver, you can access Pendrive or any USB device on your Windows computer.
Refer to some of the following articles:
- Create Windows Password Reset Disk on Windows 7 with USB Flash Drive
- Summary of some ways to fix USB Device Not Recognized on Windows 7, 8 and 10
- Fix the 'This Device Can Perform Faster' error when connecting a USB device
Good luck!
- 16 connection ports are commonly found on computers and their functions
- Disable Windows 10 keyboard in 5 simple ways
- How to disable applications running in the background on a Windows 10 computer
- How to disable USB ports on Windows, Mac and Linux
- 3 simple ways to enable / disable the Encrypting File System
- Summary of tips to fix slow computer errors on Windows 10/8 / 8.1 / 7 and Windows XP