How to fix Windows 11 computer overheating problem
Some common reasons for a computer to overheat include poor ventilation, insufficient airflow, and overclocking. But specifically on Windows 11, you may experience high temperatures after upgrading or installing Windows updates.
The telltale sign of an overheated system is when the CPU starts to idle at 60-70°C. If you notice a spike in CPU temperature after installing the update, it could be due to the firmware version. Windows update is not suitable. CPU overclocking is another common reason for a system to overheat.
If your Windows 11 computer gets hot, here are some steps to help fix the problem.
1. Install pending Windows updates

If it's determined that a recent Windows update has caused your CPU to overheat, check for a fix. If it's a common problem, you can expect a quick fix through updating Windows.
Refer: How to keep your Windows computer up to date for more details.
2. Remove invalid Windows updates

If your system started to overheat after a recent Windows update, try uninstalling the update to fix the problem. You can check your Windows update history in the Settings app. You need to find an update that matches the timeline when your Windows 11 computer started overheating. If found, uninstall the update to see if that solves the problem.
You can uninstall Windows 11 updates manually using Settings and Control Panel. After uninstalling, check if the CPU temperature is within the ideal range.
3. Check background apps with high CPU usage
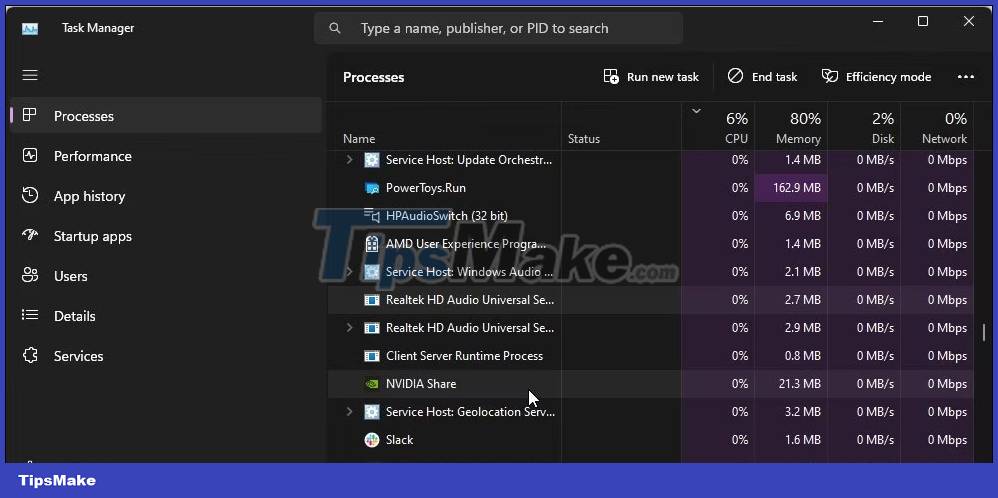
Background applications with high CPU usage are often the cause of the computer overheating. Even if an application uses only 5-6% of your CPU resources, it can still cause high CPU temperatures.
You can use Windows Task Manager to monitor background services and terminate them if needed. To do this:
- Right click on the Start menu and open Task Manager .
- In Task Manager, open the Process tab .
- Click on the CPU column header to sort the list by CPU usage.
- Check if there are any background services with high CPU usage.
- End the process and check if the CPU temperature has decreased. If so, you need to disable the service and update the related driver to fix the problem.
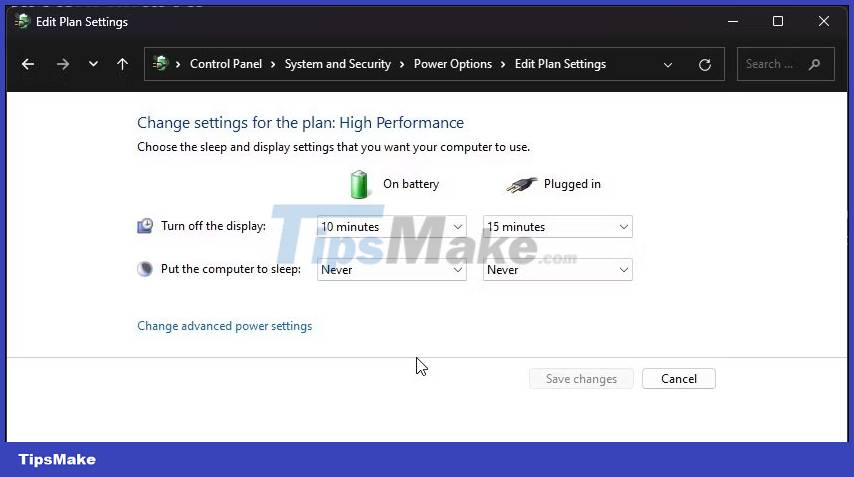
4. Select Balanced Power Plan
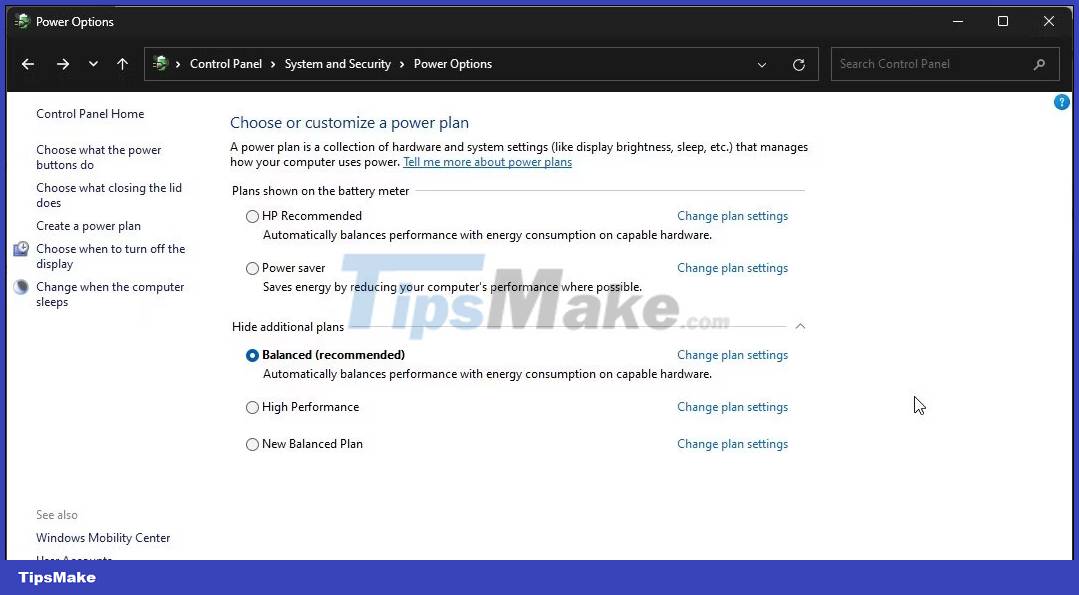
On Windows 11, you can choose from multiple power plans. By default, the system uses the Balanced power plan to provide sufficient performance and good battery life. If your laptop is set to use a high performance power plan, it may cause your system to overheat.
Ideally, the CPU temperature should hover around the 70-80॰ mark under load with the high performance power plan selected. But as a quick alternative, you can switch to a Balanced power plan to prevent your laptop from overheating.
You can change Windows Power Plan using the Control Panel. In Power Options , review your current power plan and select Balanced (Recommended) .
5. Change the maximum processor state
You can fix Windows 11 overheating problem by changing the maximum processor state in processor power management. By default, the maximum processor state is set to 100%. This means that, if required, the processor can run at its original potential and overclock as needed.
If you're not using your processor at 100% all the time, you can throttle the maximum processor state down to 99% to fix overheating issues.
To change the maximum processor state on Windows:
1. Press Win + R to open Run.
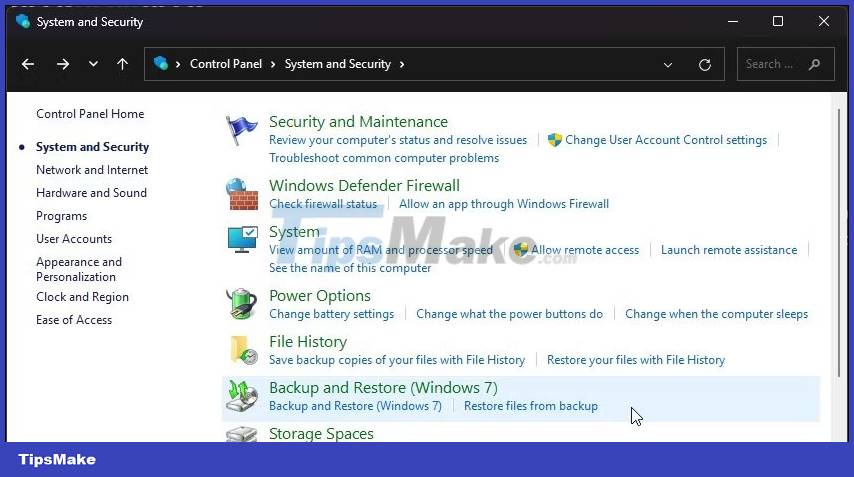
2. Type control and click OK to open the Control Panel.
3. Go to System and Security and click Power Options .
4. Next, click the Change plan settings option for the currently active power plan.
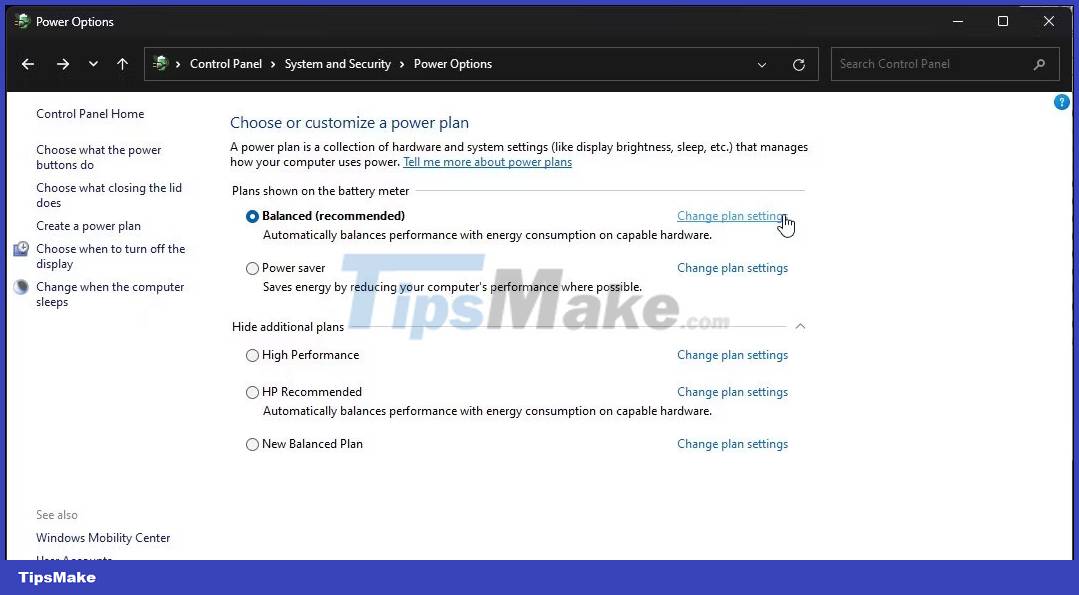
5. Click Change advanced power settings .
6. Scroll down and expand the Processor power management section .
7. Next, expand the Maximum processor state option .

8. Select On Battery and change the value to 99%.
9. Select Plugged in and change the value to 99%.
10. Click Apply > OK to save the changes.
If the Maximum processor state option is missing, you can show the hidden min and max processor status using Command Prompt.
When the new profile is applied, the CPU temperature will drop immediately. But this has downsides. Changing the maximum processor state reduces CPU speed. As a result, you may notice a drop in system performance during gaming sessions and other CPU-intensive tasks.
Again, this isn't a solution as you don't need to tweak these settings manually to get optimal cooling performance for your computer. But this is a known alternative and should work for most people who don't need to use their CPU's full potential all the time.
If the problem persists, your computer may be overheating due to insufficient airflow, fan problems, and driver problems.
6. Disable Windows Search Indexing
Searchindexer is a Windows service that makes Windows search faster. While operating in the background, this service may cause high CPU usage, thus resulting in high temperatures.
You can manage search indexing to exclude specific directories from indexing. You can also disable Windows Search Indexer completely to see if that helps with your computer overheating problem.
7. Adjust Performance Option to "Best Performance"
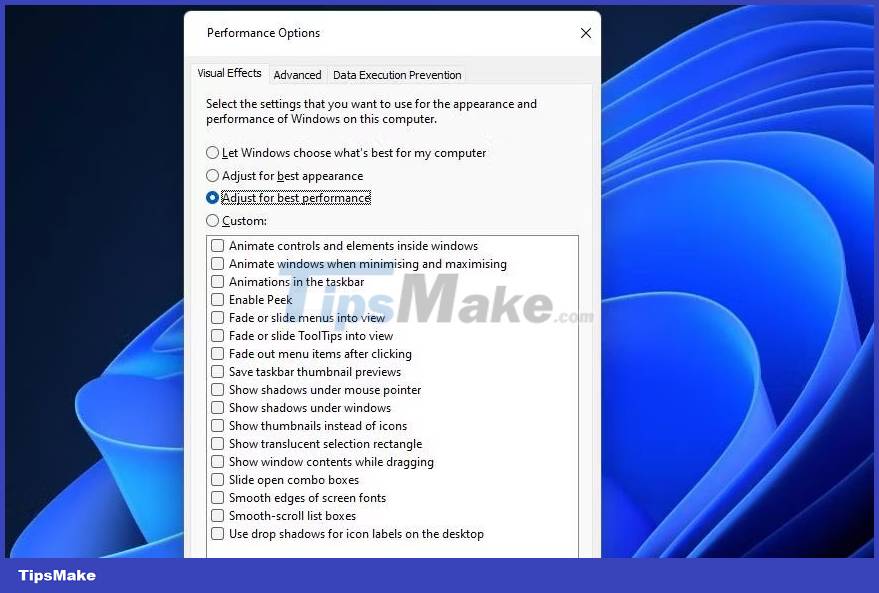
If your computer overheats during heavy use such as gaming, you can tune your system for best performance. Adjusting for best performance comes at the expense of reducing visual effects.
To tune your computer for best performance:
- Press the Win key and enter Adjust performance
- Click the Adjust the appearance and performance of Windows option from the search results.
- Next, select Adjust for best performance in the Performance Options dialog box .
- Click Apply > OK to save the changes.
8. Go back to previous version
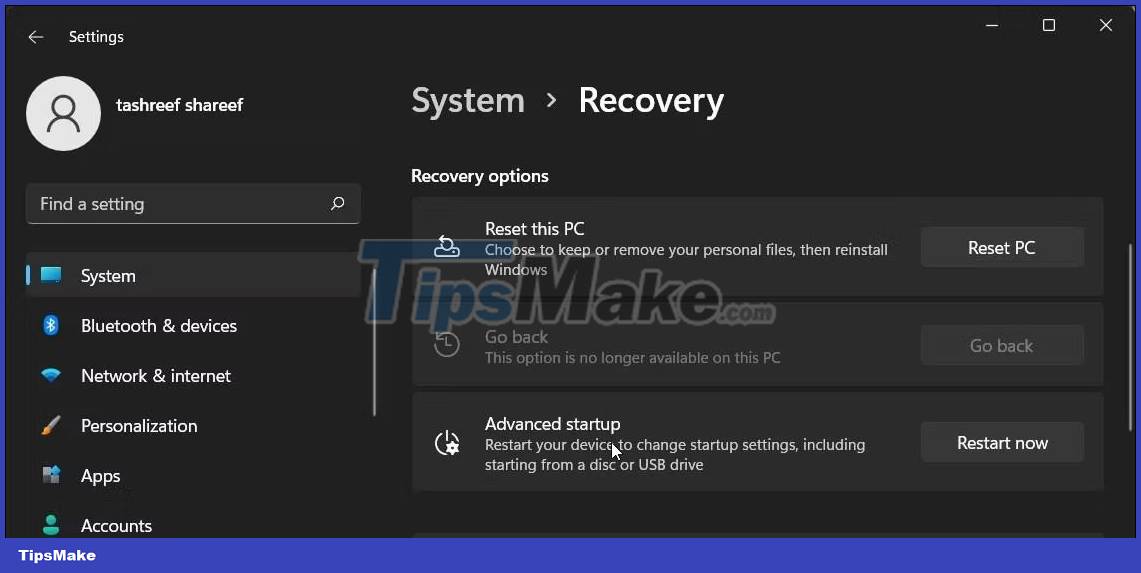
If you can't uninstall Windows updates, you can use the Go back recovery option to reinstall a previous version of Windows. This option is only available for 10 days after installing a major Windows update
To use the Go back option :
- Press Win + I to open Settings.
- In the System tab , scroll down and click Recovery .
- In the Recovery options section , click Go back . Follow the on-screen instructions to roll back to the previous version of Windows.
If the option is grayed out, that option is no longer available on your PC. Windows will disable the Go back recovery option 10 days after the upgrade. However, you can extend the 10-day rollback to 60 days on Windows 11 using Command Prompt.
9. Perform a system restore
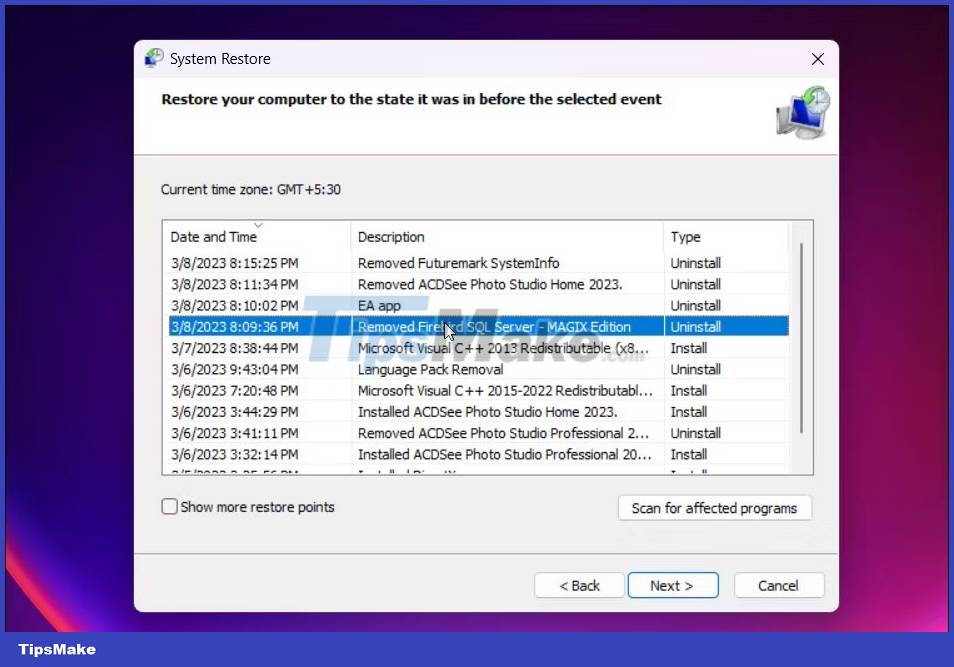
Windows 11 automatically creates a snapshot of the current state of the system, called a restore point. A new restore point is created before the update is installed. You can use an existing restore point to undo the changes and fix any problems that may be caused by an invalid Windows update or recent changes made to your system.
10. Check for hardware problems
A clean install fixes any problems caused by software conflicts. Before performing a clean install, however, consider other issues to troubleshoot laptop overheating.
First and foremost, check your laptop's air vents and clean them if necessary. Next, make sure to place the laptop on a hard surface that allows the vents to push hot air out. A good laptop cooler can support external cooling and keep temperatures low.
11. Perform a clean install of Windows 11
A clean install of Windows may seem like overkill, but it may be necessary to clean up system files and drivers left over after an upgrade. Some of these drivers and files can cause your system to malfunction and overheat. If you upgraded to Windows 11 from Windows 10, a clean install may be needed.
For a clean install of Windows 11, all you need is a Windows 11 bootable USB. Next, back up your personal files and folders to an external hard drive. Once done, boot from USB and reinstall the operating system.
 Micah Soto